
Claim Your Free Estimate Today
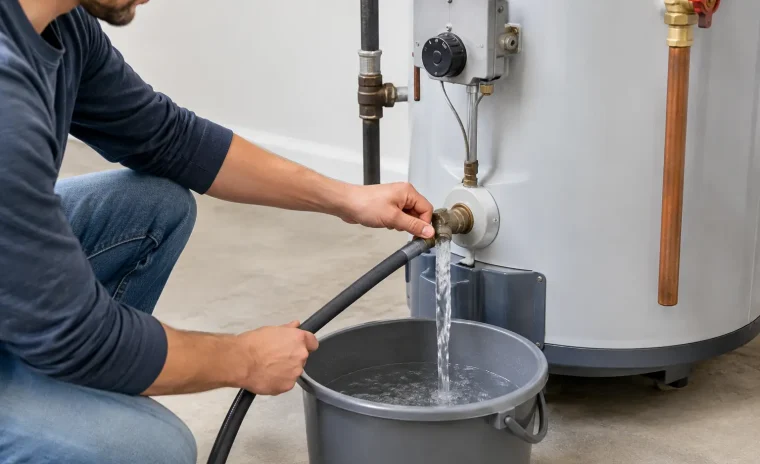
A water heater can keep producing hot water while sediment quietly builds across the bottom of the tank. In Southern Arizona, hard water can accelerate that buildup. Knowing how to flush water heater sediment can help restore efficiency, reduce popping or rumbling sounds, and support a longer service life – provided the tank and its valves are in sound condition.
Flushing is a maintenance task, not a cure-all. If your water heater is leaking, producing rusty water, failing to heat consistently, or has a damaged drain valve, forcing a flush may create a larger problem. The right approach starts with a quick assessment, safe shutdown, and a clear decision about whether this is a homeowner maintenance job or a service call.
Why water heater flushing matters in Tucson
Most tank-style water heaters collect minerals that settle out of the water during normal heating cycles. Calcium, magnesium, and other minerals sink to the bottom of the tank and gradually form a layer of sediment. The thicker that layer becomes, the harder the burner or heating elements must work to heat the water above it.
For gas water heaters, sediment can create hot spots along the bottom of the tank. That often causes a popping, crackling, or rumbling sound as trapped water turns to steam beneath the mineral layer. Electric models can lose efficiency when scale collects around the heating elements. In either case, the result may be slower recovery, higher energy use, and extra strain on the equipment.
A routine flush removes loose sediment before it becomes heavily compacted. It will not repair internal tank corrosion, a failing dip tube, a bad thermostat, or a worn-out water heater. Those issues need diagnosis before anyone opens valves or drains the unit.
Before you flush a water heater, check its condition
Start by looking around the water heater. If you see water at the base of the tank, corrosion around connections, or moisture coming from the temperature and pressure relief valve, do not proceed with a DIY flush. A leaking tank generally cannot be repaired safely and may need replacement.
Check the drain valve near the bottom as well. Plastic drain valves are common, but they can become brittle with age. If the valve is corroded, cracked, or has not been opened in many years, it may not close properly after draining. That small maintenance project can turn into an active leak.
You should also pause if the water heater is old and has never been maintained. Heavy sediment may be holding back corrosion or may clog the drain valve as it breaks loose. There is no fixed rule for every tank, but extra caution makes sense with older equipment, visible corrosion, or a history of poor hot-water performance.
What you need to flush a water heater
Gather your equipment before shutting the unit down. You will need a standard garden hose long enough to reach a safe drainage point, a bucket, work gloves, and a flat-head screwdriver if your drain valve requires one. Keep towels nearby in case the hose connection drips.
Choose a drain location carefully. Water leaving the tank can be very hot, and sediment can stain surfaces. A driveway, exterior drain area, or suitable floor drain may work, depending on your property layout and local conditions. Do not drain hot water onto landscaping, where it can damage plants, or into an area where it can create a slip hazard.
How to flush water heater sediment step by step
1. Turn off the heat source
For an electric water heater, turn off power at the circuit breaker. Never allow the heating elements to operate while the tank is empty or partly empty, because they can burn out quickly.
For a gas water heater, turn the gas control to the pilot setting or follow the manufacturer instructions for shutting down the burner. If you smell gas at any point, stop immediately. Leave the area and arrange for qualified service rather than trying to troubleshoot the appliance.
2. Let the water cool and stop incoming water
If possible, let the tank sit for several hours so the water can cool. This reduces the risk of burns. Once the water has cooled, close the cold-water supply valve at the top of the unit.
Open a hot-water faucet in a nearby sink or bathtub. This relieves pressure in the plumbing system and allows air into the tank while it drains. Leave that faucet open during the flushing process.
3. Connect the hose and drain the tank
Attach the garden hose securely to the drain valve. Run the other end to your chosen drain location, making sure the hose will stay in place. Keep the hose free of sharp bends that could restrict flow.
Open the drain valve slowly. Water should begin moving through the hose. If nothing comes out, confirm the hot-water faucet is open and check that the hose is not kinked. A completely blocked drain valve may indicate packed sediment. Do not force it with sharp tools or excessive pressure, as that can damage the valve or tank.
4. Flush until the water runs clearer
Allow the tank to drain. When the flow slows, briefly open the cold-water supply valve to stir up remaining loose sediment, then close it again and continue draining. Repeating this process a few times can help clear mineral particles from the bottom of the tank.
Watch the water leaving the hose if practical. It may start cloudy or contain small particles. Continue until it looks substantially clearer. Do not expect perfectly clear water from every older tank. The goal is to remove loose buildup without creating a blockage or stressing failing components.
5. Refill the tank before restoring power or gas
Close the drain valve firmly, but do not overtighten it. Remove the hose, then open the cold-water supply valve fully. Keep the nearby hot-water faucet open while the tank refills. When water flows steadily from that faucet without sputtering, the tank is full and most air has been pushed from the system.
Inspect the drain valve and surrounding area for leaks. Only after the tank is completely full should you restore power to an electric water heater. For gas units, return the control to its normal operating setting according to the manufacturer instructions. Check that the burner ignites and the unit begins its normal heating cycle.
How often should a water heater be flushed?
For many homes, flushing a tank water heater once a year is a reasonable starting point. Homes with especially hard water, a large household, or frequent hot-water use may benefit from more frequent maintenance. The right schedule depends on water quality, equipment age, and whether the home has a water treatment system.
If your water heater has gone several years without service, do not assume an aggressive flush is the best first step. A professional inspection can identify whether sediment removal is appropriate and whether the drain valve, anode rod, expansion tank, and relief valve need attention as well.
When to call for water heater service instead
A flush cannot solve every hot-water issue. Call a plumbing professional if you have no hot water, inconsistent temperatures, discolored water, a visible tank leak, frequent relief-valve discharge, a failed drain valve, or loud noises that continue after flushing. These symptoms can point to a worn heating element, burner issue, pressure problem, corrosion, or a tank nearing the end of its service life.
For commercial properties, it is especially wise to schedule service rather than risk downtime or water damage. A water heater problem can interrupt restrooms, kitchens, tenant spaces, and daily operations. A clear diagnosis helps you decide whether maintenance, repair, or replacement is the most dependable option.
Acclaimed Drain And Plumbing Solutions LLC provides straightforward water heater inspections, maintenance, repair, and replacement options for Southern Arizona properties. You will get a clear explanation of the condition, the available options, and the work needed to restore reliable hot water.
If your tank drains normally and shows no warning signs, regular flushing can be a practical part of home maintenance. If anything looks corroded, leaks after the valve is opened, or does not operate as expected, stop there – protecting your property is more valuable than finishing a DIY task.
