
Claim Your Free Estimate Today

Table of Contents
- Common Signs of Water Heater Failure
- What Causes a Water Heater to Fail? 7 Common Reasons
- Water Heater Maintenance Tips That Prevent Failure
- Repair or Replace? A Decision Matrix for Homeowners
- DIY Safety Warnings: When to Call a Licensed Plumber
- Frequently Asked Questions
Last Updated: September 10, 2026
Common Signs of Water Heater Failure
A water heater usually announces itself before it quits. The most common signs of water heater failure are lukewarm water, rumbling or popping sounds, rust in the water, puddles at the tank base, and inconsistent water pressure.
Homeowners across Tucson and Southern Arizona call Acclaimed Drain And Plumbing Solutions, LLC when these symptoms appear, and the pattern is consistent: catching a failing water heater early costs less than waiting for a burst tank or a flooded utility room. A water heater fail rarely happens without warning, the unit signals for weeks or months before the final breakdown.
Here are the warning signs worth acting on:
- Rumbling, popping, or banging noises during heating cycles
- Water that runs warm instead of hot, or runs out quickly
- Rust-colored or metallic-tasting water from hot taps only
- Moisture, corrosion, or small puddles near the tank base
- The pressure relief valve dripping or discharging
- The pilot light repeatedly going out
- The unit is past its expected service life
Each symptom points to a specific cause, telling you whether a repair will hold or replacement is smarter.
What Causes a Water Heater to Fail? 7 Common Reasons
Seven failure modes account for most water heater breakdowns: sediment buildup, corrosion of the tank or anode rod, thermostat and heating element faults, pilot light and thermocouple problems, pressure relief valve failure, leaks and rust, and age. Several are preventable with routine maintenance.
Sediment Buildup and Mineral Deposits
Sediment buildup is the leading cause of premature water heater failure in hard-water areas. Minerals settle as scale on the tank floor and heating elements, forcing the unit to work harder. Sediment insulates the burner or element, raising internal temperatures, accelerating corrosion, and creating the rumbling sound homeowners describe as “boiling.” In a gas unit it also reduces the recovery rate. Flushing the tank annually removes most of this buildup before it hardens.
Corrosion and a Worn Anode Rod
Corrosion is what actually kills most water heaters. Every steel tank has a glass lining and a sacrificial anode rod that corrodes first so the tank doesn’t. Once the rod is consumed, the tank becomes the sacrificial metal, and a pinhole leak is usually months away.
Anode rods wear out long before the tank does, and assuming the tank is fine because the water still runs hot is a common mistake. By the time you see rust in the water, the tank interior is already compromised. Anode rods can be inspected and replaced, one of the least expensive ways to extend service life.
Thermostat, Heating Element, and Circuit Breaker Problems
Thermostat and heating element failures are the most common electrical faults. A failed element produces no hot water; a faulty thermostat leaves water scalding or barely warm. Both are diagnosed with a multimeter and continuity testing.
Before assuming the element is dead, check the circuit breaker, a tripped breaker cuts power entirely, and resetting it costs nothing. If it trips again immediately, that points to a shorted element or wiring fault needing a licensed technician.
Pilot Light and Thermocouple Issues
Pilot light problems are specific to gas water heaters, and a thermocouple is usually the culprit. This small safety device senses whether the pilot flame is lit; if it fails, it shuts off the gas supply, leaving a pilot that won’t stay lit no matter how many times you relight it.
A failed thermocouple is inexpensive to replace, but a pilot that keeps going out can also mean a dirty orifice, faulty gas control valve, or venting problem. Venting and combustion issues are not DIY. If you smell gas or the burner behaves erratically, call a professional.
Pressure Relief Valve and Thermal Expansion Problems
The pressure relief valve releases water when tank pressure climbs too high, usually from thermal expansion as water heats. A dripping relief valve signals the tank is under stress. A relief valve that sticks closed is far more dangerous than one that leaks: if it can’t open, pressure has nowhere to go and the tank can burst. If yours discharges regularly, the fix may be a thermal expansion tank rather than a new valve, which is why proper diagnosis matters.
Leaking, Rust, and Discolored Water
Leaks and rust are the clearest signs a tank is finished. Discolored water from hot taps only usually means the tank interior is corroding. Pooling at the base can come from a loose fitting, a failing dip tube, or a crack in the tank itself, risking water damage to floors, walls, and belongings.
Tank integrity can’t be patched. A crack in the tank shell means replacement, not repair. Small leaks at the manifold or fittings can sometimes be fixed, but any leak from the tank body itself is a replacement job.
Age and the Average Lifespan of a Water Heater
The average lifespan of a water heater is 8 to 12 years for a conventional tank and 20 or more for a well-maintained tankless model (energy.gov). Past the 10-year mark, the odds of major failure rise sharply and repairs start costing more than the equipment’s remaining value.
Age changes the repair-versus-replace math. A heating element on a 4-year-old unit is a clear repair; the same failure on a 13-year-old tank with visible corrosion signals replacement. If you don’t know your unit’s age, the serial number on the manufacturer’s label encodes the production date.
Water Heater Maintenance Tips That Prevent Failure
Preventative maintenance is the most effective way to avoid a water heater fail, and the one thing most homeowners skip until something breaks. The difference between a tank that lasts 8 years and one that lasts 14 is rarely the brand, it’s whether anyone flushed the sediment, tested the safety valve, and swapped the anode rod before it was gone.
Here is a maintenance schedule organized by frequency, what each task does, and what skipping it costs.
Annual Tasks
Flush the tank. Connect a garden hose to the drain valve, run it to a floor drain or outside, and drain until the water runs clear. On a gas unit, shut off the gas and set the thermostat to pilot first; on an electric unit, cut power at the breaker. Skipping this is the number-one reason sediment hardens into a scale layer that insulates the burner and shortens tank life.
Test the pressure relief valve. Lift the test lever and let it snap back. You should hear water discharge into the drain tube and then stop. If nothing comes out, the valve is stuck and needs replacement; if it keeps dripping, the valve seat is compromised. This is a safety device, not a convenience feature.
Check the thermostat setting. Most manufacturers recommend around 120°F for a balance of safety and efficiency (energy.gov). Higher settings accelerate scale formation and scald risk; lower settings can allow bacterial growth.
Inspect for corrosion and moisture. Check the fittings, inlet and outlet connections, T&P valve, and tank base. Any rust streak, mineral crust, or damp spot is an early warning, catching a weeping fitting early is a wrench turn; catching it late is a flooded utility room.
Every Two to Three Years
Inspect the anode rod. On most tank units it’s accessible from the top. Pull it and look: if the core wire is exposed or the rod is more than half consumed, replace it. It’s one of the least expensive parts and the one that determines whether the tank becomes the sacrificial metal.
Check the expansion tank (if you have one). A closed system with a backflow preventer needs a thermal expansion tank to absorb pressure as water heats. Tap it; it should sound hollow on top and full on the bottom. If it sounds full throughout, the bladder has failed and the tank needs replacement.
Every Five Years
Consider a professional inspection. A licensed technician can check the flue and venting on a gas unit, verify the gas control valve, test elements and thermostats with a multimeter, and inspect the dip tube, components homeowners rarely touch but that account for many mid-life failures.
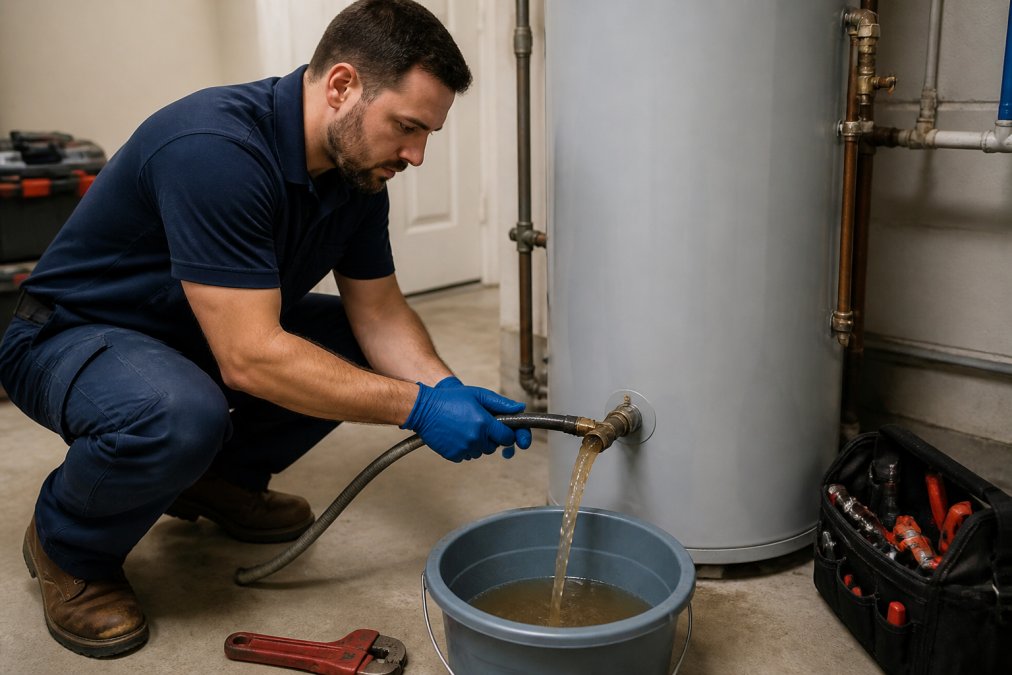
A practical water heater maintenance checklist:
- Flush the tank once a year to clear sediment buildup
- Test the pressure relief valve by lifting the lever and confirming it reseats
- Inspect the anode rod every 2-3 years and replace it when consumed
- Check thermostat settings and confirm they match your hot water needs
- Look for rust, corrosion, or moisture at fittings and the tank base
- Verify the circuit breaker and gas supply are functioning normally
- Listen for new rumbling or popping during heating cycles
- Check the expansion tank for a failed bladder every 2-3 years
- Schedule a professional inspection every 5 years
Pro Tip
Set a recurring calendar reminder for the same month each year to flush the tank. Homeowners who flush on a fixed schedule catch sediment problems before they harden, which is the difference between a quick drain and a failed heating element. Pair the reminder with your seasonal HVAC filter change so it becomes automatic.
Set a recurring calendar reminder for the same month each year to flush the tank. Homeowners who flush on a fixed schedule catch sediment problems before they harden, which is the difference between a quick drain and a failed heating element. Pair the reminder with your seasonal HVAC filter change so it becomes automatic.
The Department of Energy’s guidance on water heating notes that maintenance and correct temperature settings both affect how long a unit lasts and how much energy it consumes. Lowering the thermostat to a moderate setting also reduces scale formation and thermal stress on the tank.
What Skipping Maintenance Actually Costs You
A tank that is never flushed accumulates sediment that forces the burner to run longer for the same hot water, showing up as higher energy use month after month. The sediment also traps heat against the tank floor, accelerating corrosion from the inside. By the time you notice rumbling, the damage is already underway. A $15 anode rod replaced on schedule can add years to a tank; without anode service, the same tank typically fails at the seam, and replacement costs far more than the rod ever would have. If you’re not comfortable draining a tank, working around gas connections, or testing electrical components, a professional maintenance visit covers all of these tasks in one appointment and documents each component’s condition as a baseline for next year.
Repair or Replace? A Decision Matrix for Homeowners
The repair-or-replace question is where most homeowners get stuck, and most articles answer it with a vague “it depends.” It depends on a few concrete factors: the unit’s age, the type of failure, the tank’s condition, and how the repair cost compares to remaining service life.
The Core Rule of Thumb
Repair is usually right when the unit is under 8 years old, the failure is a single component, and the tank shows no corrosion or leaking. Replacement is usually right when the unit is past 10 years, the tank is leaking or rusted, or the repair cost approaches a meaningful share of a new installation.
Age matters because water heaters fail in stages. A heating element or thermostat can fail on a 5-year-old unit with years of tank life left. The same failure on a 13-year-old tank with visible corrosion signals the tank is near the end of its service life, and the repair money is better put toward replacement.
The Decision Matrix
| Situation | Recommended Action | Why |
|---|---|---|
| Unit under 8 years, single part failed | Repair | Component replacement restores full function |
| Unit 8-10 years, minor fault, no corrosion | Repair with inspection | Still has remaining service life |
| Unit over 10 years, any major fault | Replace | Repair rarely outlasts the tank |
| Tank leaking or rusted through | Replace | Tank integrity cannot be restored |
| Repeated element or thermostat failures | Replace | Signals systemic wear |
| Relief valve discharging regularly | Diagnose first | May need expansion tank, not replacement |
| Pilot or thermocouple failure, tank sound | Repair | Inexpensive part, tank still has life |
| Sediment-related rumbling, tank over 10 years | Replace | Sediment damage is usually internal and advanced |
How to Think About the Money
Frame the decision by comparing repair cost against remaining service life. If a unit is 12 years old and the expected lifespan is 8 to 12 years, you’re already at or past the average. A significant repair then buys only a short window of function, and a second failure is likely within a year or two.
A common pattern: a homeowner pays for one repair, then another within a year, then replaces the unit anyway. Those repair bills usually add up to more than replacing at the first major failure. The exception is a cheap, single-component fix on a young tank, where repair is clearly the better financial move.
Factors That Push Toward Replacement
- The tank is leaking from the body, not a fitting
- Rust-colored water comes from hot taps only
- The unit is past its expected service life
- The same component has failed more than once
- The tank shows corrosion at the seams or base
- You are already planning to upgrade to a tankless or high-efficiency model
Factors That Push Toward Repair
- The unit is well under 10 years old
- The failure is a single, accessible component
- The tank is dry, sound, and free of corrosion
- The repair is a small fraction of the cost of a new unit
- The unit has been maintained on schedule
Watch Out
Do not patch a leaking tank with sealant or epoxy. A tank shell that has cracked is under constant pressure, and a temporary patch can fail without warning, releasing scalding water and causing significant water damage. Replace the unit instead.
Do not patch a leaking tank with sealant or epoxy. A tank shell that has cracked is under constant pressure, and a temporary patch can fail without warning, releasing scalding water and causing significant water damage. Replace the unit instead.
When to Get a Professional Diagnosis
If you’re on the fence, a professional inspection is the cheapest way to get a real answer. A technician can test the elements and thermostats, check the anode rod, inspect the tank interior through the fittings, and tell you whether the failure is isolated or a symptom of a tank on its way out. If you’re weighing repair against replacement, ask for the unit’s age, the tank’s condition, and an estimate for both paths. A good answer includes the expected remaining life if you repair, not just the repair cost.
DIY Safety Warnings: When to Call a Licensed Plumber
Some water heater tasks are safe for a careful homeowner; some are not. Testing a pressure relief valve, flushing the tank, and checking the circuit breaker are reasonable DIY jobs. Anything involving gas supply, combustion, venting, or opening the tank itself should go to a licensed plumber.
The risks are real. Bad gas work can cause a leak, fire, or carbon monoxide exposure. Water heater electrical work involves high voltage that stays dangerous even with the breaker off if wiring is mislabeled. And a tank that bursts under pressure can cause serious injury and thousands in water damage.
Key Takeaway
If you smell gas, see scorching near the burner, or find the breaker tripping repeatedly, stop and call a professional. These are the situations where a DIY attempt turns a repair into an emergency.
If you smell gas, see scorching near the burner, or find the breaker tripping repeatedly, stop and call a professional. These are the situations where a DIY attempt turns a repair into an emergency.
Acclaimed Drain And Plumbing Solutions, LLC handles water heater repair and installation, tankless water heaters, leak detection, and preventative maintenance, with 24/7 emergency service and live dispatchers when a failure can’t wait. Our technicians diagnose the actual cause, document their findings, and give you practical options rather than a one-size-fits-all answer. If you’re weighing a repair against a replacement, a professional inspection tells you which one your unit actually needs.
Frequently Asked Questions
What is the most common cause of water heater failure?
Sediment buildup is the leading cause of water heater failure. Minerals like calcium and magnesium settle at the bottom of the tank, creating a barrier that forces the heating element or burner to work harder. Over time, this leads to overheating, strange popping noises, and eventual tank failure. Flushing the tank annually can remove sediment and extend the unit’s life by several years.
What is the average lifespan of a water heater?
Tank-style water heaters typically last 8 to 12 years, while tankless models can last up to 20 years with proper maintenance. The average lifespan of a water heater depends on water quality, usage, and whether you flush the tank regularly. If your unit is over 10 years old and showing signs of failure, replacement is often more cost-effective than repair.
Can a water heater be repaired or should it be replaced?
Small components like thermostats, heating elements, and thermocouples can often be repaired for a fraction of replacement cost. However, if the tank itself is leaking, corroded, or over 10 years old, replacement is the safer choice. A leaking tank can burst and cause significant water damage. A licensed plumber can assess the unit and help you decide.
How often should I flush my water heater to prevent failure?
Flush your water heater once a year to remove sediment and mineral deposits. If you live in an area with hard water, like Southern Arizona, you may need to flush it every six months. Regular flushing is one of the best water heater maintenance tips to prevent failure and keep your unit running efficiently for years.
A failing water heater rarely gives you unlimited time to decide. The signs are there, and acting on them early is what separates a planned replacement from a flooded utility room. Acclaimed Drain And Plumbing Solutions, LLC offers free estimates, financing options for eligible projects, and a maintenance membership program that keeps your unit on a flushing and inspection schedule. Get started with Acclaimed Drain And Plumbing Solutions, LLC and claim your free estimate today.
